iPhone 拍摄的 HDR 照片存储在一个 HEIC 文件中,文件中和 HDR 相关的主要有三部分:
- Baseline Image
- Gainmap Image
- Metadata 中的 Headroom
本文中,将会使用两种方法处理 HEIC 文件,一种是使用 Apple 的 Core Image 框架读取,另一种则是结合文档和 Python 手动计算。
文档方面,最直接的是 Apple 官方的文档,介绍了在不使用 Apple 框架的情况下,如何提取和使用这些数据:
https://developer.apple.com/documentation/appkit/applying-apple-hdr-effect-to-your-photos
Headroom
Apple 通常使用 Headroom 来表示 HDR 与 SDR 间的亮度差距,是 Apple 的 HDR 生态中最核心的参数,它们的显示器也经常用 Headroom 来描述 HDR 能力,比如 iPhone 最高有 8x 的 Headroom,代表 HDR 图像的亮度可以达到 SDR 的 8 倍。
照片中的 Headroom 有三种获取方式:
XMP:HDRGainMapHeadroom直接获得- EXIF 中的两个 MakerNote 计算后得到。
MakerNotes:HDRHeadroom(tag0x0021)MakerNotes:HDRGain(tag0x0030)
- Core Image 读取(Swift)
方式 1 和 2 最好用 Exiftool,方法 3 使用 Swift。
// ReadHeadroom.swift
import CoreImage

let fileURL = URL(fileURLWithPath: "image.heic")

// 1. 加载图像并开启 HDR 扩展选项
guard let image = CIImage(contentsOf: fileURL, options: [.expandToHDR: true]) else {
    fatalError("无法加载图像")
}

// 2. 读取 contentHeadroom 属性
print("HDR Headroom: \(image.contentHeadroom)")
以 Core Image 的结果为基准,方法 1 与之最接近(但会少几位有效数字),方法 2 则是 Apple 文档推荐的,不使用 Apple 框架时的做法,有一点点偏差。
Baseline Image
Apple 的文档里一般叫 SDR RGB。
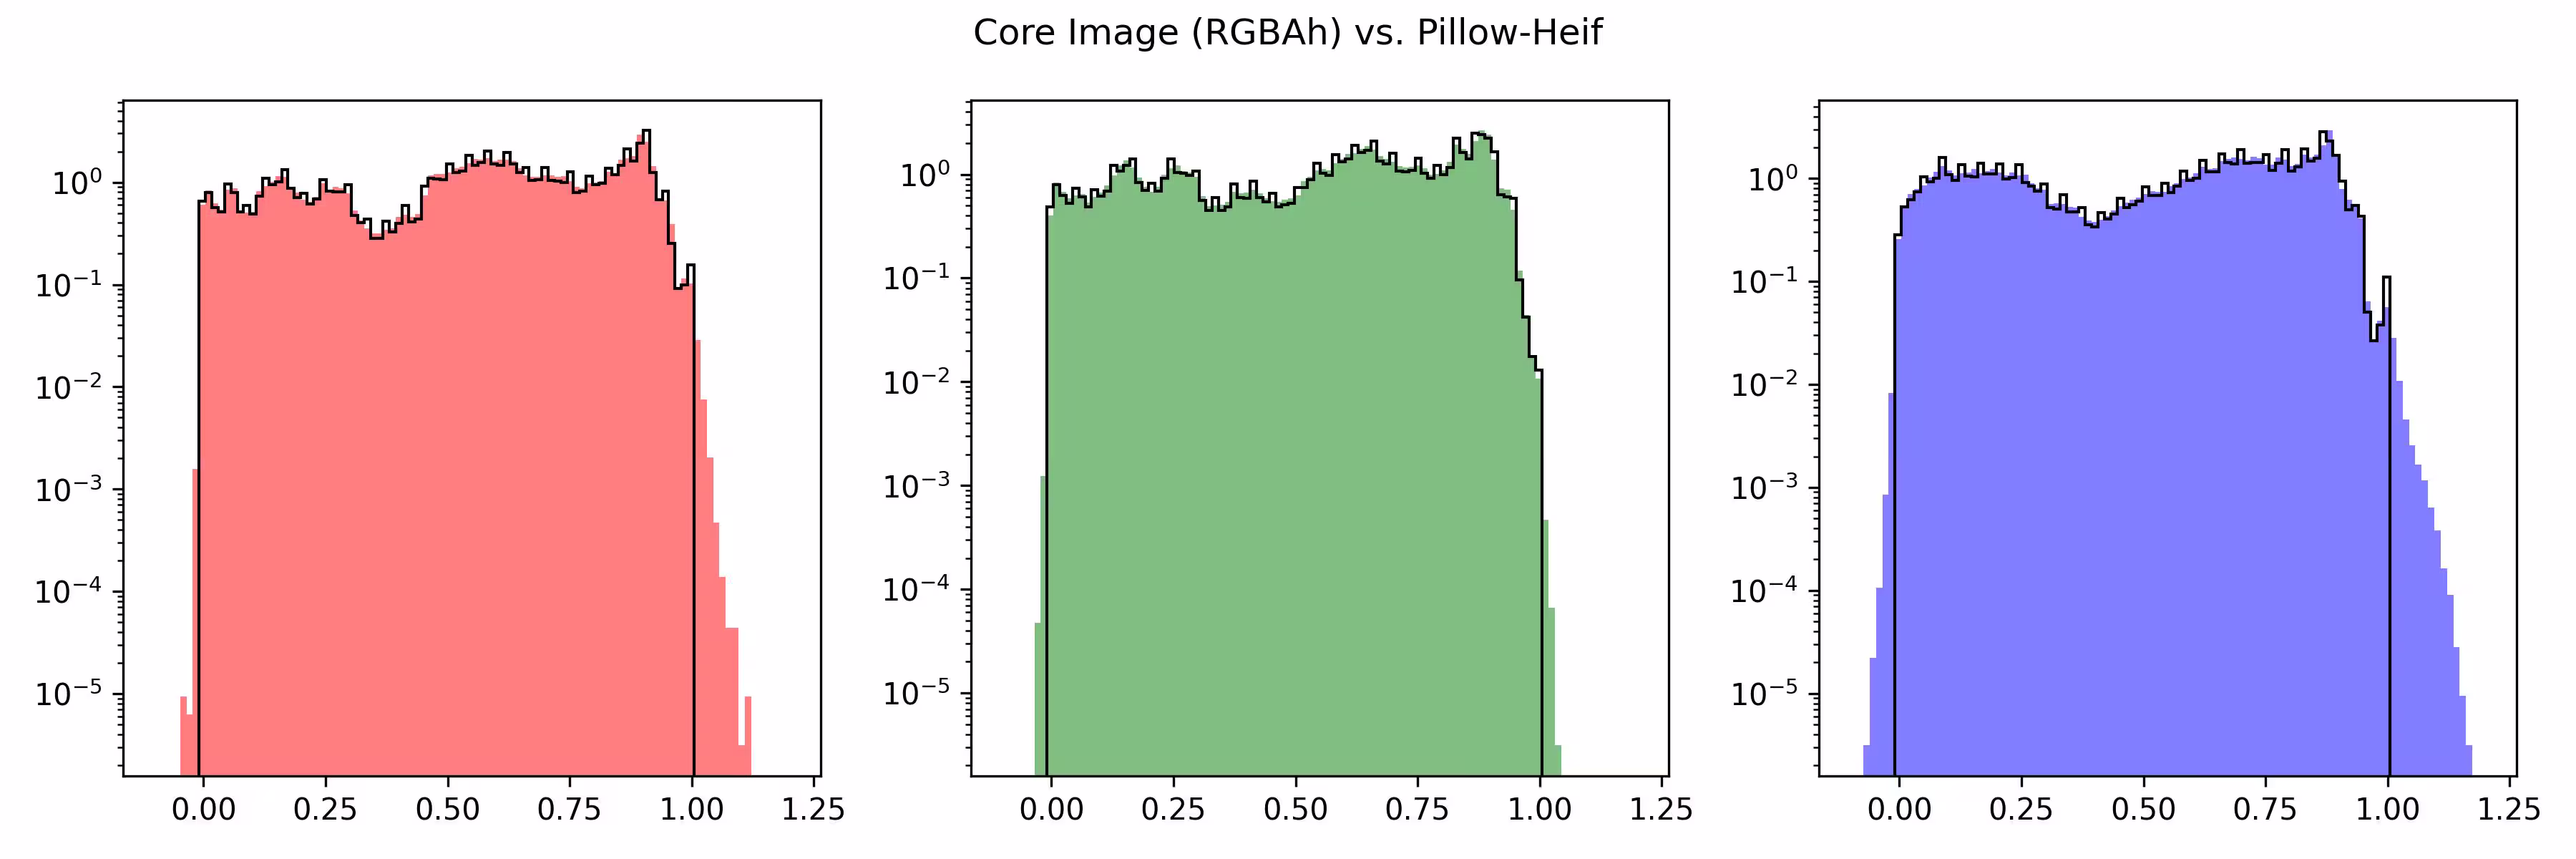
一个 8 Bit 的基准图像,范围理论上为 0-1 之间。对 Apple 来说位于 Display P3 空间,使用 sRGB 传递函数,颜色空间使用 ICC 标记,可以用各种支持 HEIF 的库提取,主要有以下几种:
- 关闭
.expandToHDR选项通过 Core Image 读取,可以选颜色空间,比如extendedLinearDisplayP3或者displayP3,也可以选不同的格式,比如RGBAh或RGBA8。 - 通过 ImageIO 读取,得到的是 8 Bit 图像。
- 通过
pillow-heif提取,得到的也是 8 Bit 图像。

当 format 为 RGBAh 或 RGBAf 时,Core Image 解码后的图像也会有超过 1.0 或小于 0.0 的值,表示其也有一定的 HDR 信息?这对于之后的 HDR 处理会有影响,稍后会提到。
除此之外,当 format 为 RGBA8 时,Core Image 解码后的图像范围在 0-255 之间,且大部分像素值与使用 pillow-heif 提取的图像一致,在高亮和暗部的地方会存在差异,也许是 Core Image 存在一些色调压缩的处理,ImageIO 读取的结果与 pillow-heif 也存在一定的偏差,更像是解码器的处理。
Gainmap Image
增益图,记录了如何结合 Baseline Image 计算出 HDR 图像。本身也是一个图像,范围在 0-1 之间,长宽均为 Baseline Image 的一半,灰度图,使用了 Rec.709 传递函数。
通过 Core Image 可以提取该图,之后可以保存成无压缩的 TIFF 方便 Python 处理。
// ExtractGainmap.swift
import CoreImage

let fileURL = URL(fileURLWithPath: "image.HEIC")

// 1. 指定 auxiliaryHDRGainMap 选项提取 Gain Map
let options: [CIImageOption: Any] = [
    .auxiliaryHDRGainMap: true,
    .applyOrientationProperty: true
]

guard let gainMapCIImage = CIImage(contentsOf: fileURL, options: options) else {
    fatalError("未找到 Gain Map 信息")
}

// 2. 将 CIImage 渲染为 CGImage
let context = CIContext()
let colorSpace = CGColorSpace(name: CGColorSpace.extendedLinearDisplayP3)!

let gainMapCGImage = context.createCGImage(
    gainMapCIImage,
    from: gainMapCIImage.extent,
    format: .RGBA8,
    colorSpace: colorSpace
)
Apple 文档也说明了不依赖其框架时的做法。
Get the existing HDR gain map from the image’s auxiliary data using the
urn:com:apple:photo:2020:aux:hdrgainmapimage data type. The gain map is untagged and formatted as linear data. It’s encoded using the Rec.709 transfer function and is 1/4 the resolution of the original image.
比如 Python 中,可以用 pillow-heif 提取,结果与 Core Image 得到的是完全一致的。
# extract_gainmap.py
import pillow_heif
from PIL import Image

heif_file = pillow_heif.read_heif("input.heic")

# 提取 HDR Gainmap 的辅助图像 ID
gain_map_urn = "urn:com:apple:photo:2020:aux:hdrgainmap"
if gain_map_urn in heif_file.info.get("aux", {}):
    gain_map_id = heif_file.info["aux"][gain_map_urn][0]
    aux_image = heif_file.get_aux_image(gain_map_id)

    # 构建 PIL 图像
    gain_map = Image.frombytes(
        aux_image.mode,
        aux_image.size,
        aux_image.data,
        "raw",
        aux_image.mode,
        aux_image.stride
    )

转换到 HDR
根据文档记录的如何手动进行 HDR 转换,和别的双层 HDR 图像格式类似。
操作之前,先进行如下步骤:
- 调整 Gainmap 的尺寸,使其与原图匹配。
- 使用 Rec.709 传递函数线性化 Gainmap 图像。
- 使用对应的传递函数线性化 SDR RGB 图像,如果通过 Core Image 读取,可以指定
extendedLinearDisplayP3等线性的空间。
然后应用如下公式进行转换:
hdr_rgb = sdr_rgb * (1.0 + (headroom - 1.0) * gainmap)
此时得到的是一个线性的 HDR 图像,其中 1.0 表示参考白亮度,该公式在两个图层均为 1.0 的情况下输出为 headroom,确保了峰值不会超过 headroom 值。
也可以通过 Core Image 直接转换,按照 Apple 的说法,转换后的最大值不应该超过 Headroom,但 Core Image 的结果却显著超过,也许和之前提到的 Baseline Image 的范围有关。
// ConvertToHDR.swift
import CoreImage

let fileURL = URL(fileURLWithPath: "image.heic")

// 提取并应用 HDR 参数
let hdrOptions: [CIImageOption: Any] = [.expandToHDR: true]
guard let hdrCIImage = CIImage(contentsOf: fileURL, options: hdrOptions) else {
    fatalError("图像加载失败")
}

let context = CIContext()
let colorSpace = CGColorSpace(name: CGColorSpace.displayP3_PQ)!

// 渲染为高动态范围格式 (RGBAh)
let hdrCGImage = context.createCGImage(
    hdrCIImage,
    from: hdrCIImage.extent,
    format: .RGBAh,
    colorSpace: colorSpace
)
下图是使用 Core Image 直接得到的 AVIF 图像,转换用到的脚本可以在后面的章节下载。

以 Core Image 的转换结果为基准,手动转换后的结果平均下来约有 1% 的差距,主要就是出现在高亮部分的截断上。下图是手动提取,手动转换得到的 HDR 图像,完全没有用到 Apple 的接口。

如果使用 Core Image 提取的三个部分,再手动的进行转换,虽然高亮部分不会截断,但结果也会存在一些偏差,尚不清楚原因。下图是先用 Swift 提取三个部分,再手动转换为 HDR 图像的结果。

高压缩的 HDR 图像
之前,朋友试图将这种 iPhone 拍摄的 HDR 照片转换为单层的 HDR 图像,并使用 AVIF 来获得更高的压缩率,那个项目 中使用的就是纯手动的解析与转换方法,与原图片存在一定的差距。
现在有了 Swift,我们可以全程调用 Apple 框架来进行读取和转换,包括 AVIF 或 HEIC 的输出,在 macOS 上看结果是完全一致的,我暂时将这个小脚本放在对象存储上供大家测试。
点击 下载。
swift encoding-apple-heic-beta.swift
不过现在回头思考一下,单层的纯 HDR 格式在压缩率上能取得显著的进步吗?
- 双层:一个 8bit 的全分辨率 rgb,一个 8bit 的 1/4 分辨率灰度。
- 单层:一个 10bit 的全分辨率 rgb。
注意:iOS 26 的 HDR 截图
在 iOS 26 中,Apple 增加了对 HDR 截图的支持,虽然也是 HEIC,也是双层结构,但手动解析的办法和 iPhone 拍摄的 HDR 照片不一样,通过 Apple 框架读取是没问题的。