Previously: By preserving all EXIF data and replacing the JPEG image, test images were successfully displayed on Sony’s built-in screen, and some of its characteristics were measured. Going a step further this time, external images were displayed on the Hasselblad X2D 100C by replacing the preview image.
Modifying the JPEG Files
Using some JPEG files shot with the Hasselblad X2D as samples, I analysed their file structure and discovered that in the APP2 segment there is another complete JPEG stream, named “/Hasselblad/preview” within the file. This JPEG is used as the preview image during in-camera playback, and only switches to rendering the full image when zoomed in.
By keeping the original file’s EXIF, MakerNote and various APP segments unchanged, only replacing the image data of this preview JPEG, and padding any shortfall in file length with zeros, the preview image in the JPEG can be modified while preserving the file structure and offsets.
When the modified file is loaded back into the camera, the result is that the modified preview is shown during playback, and the original image is shown when zoomed in.
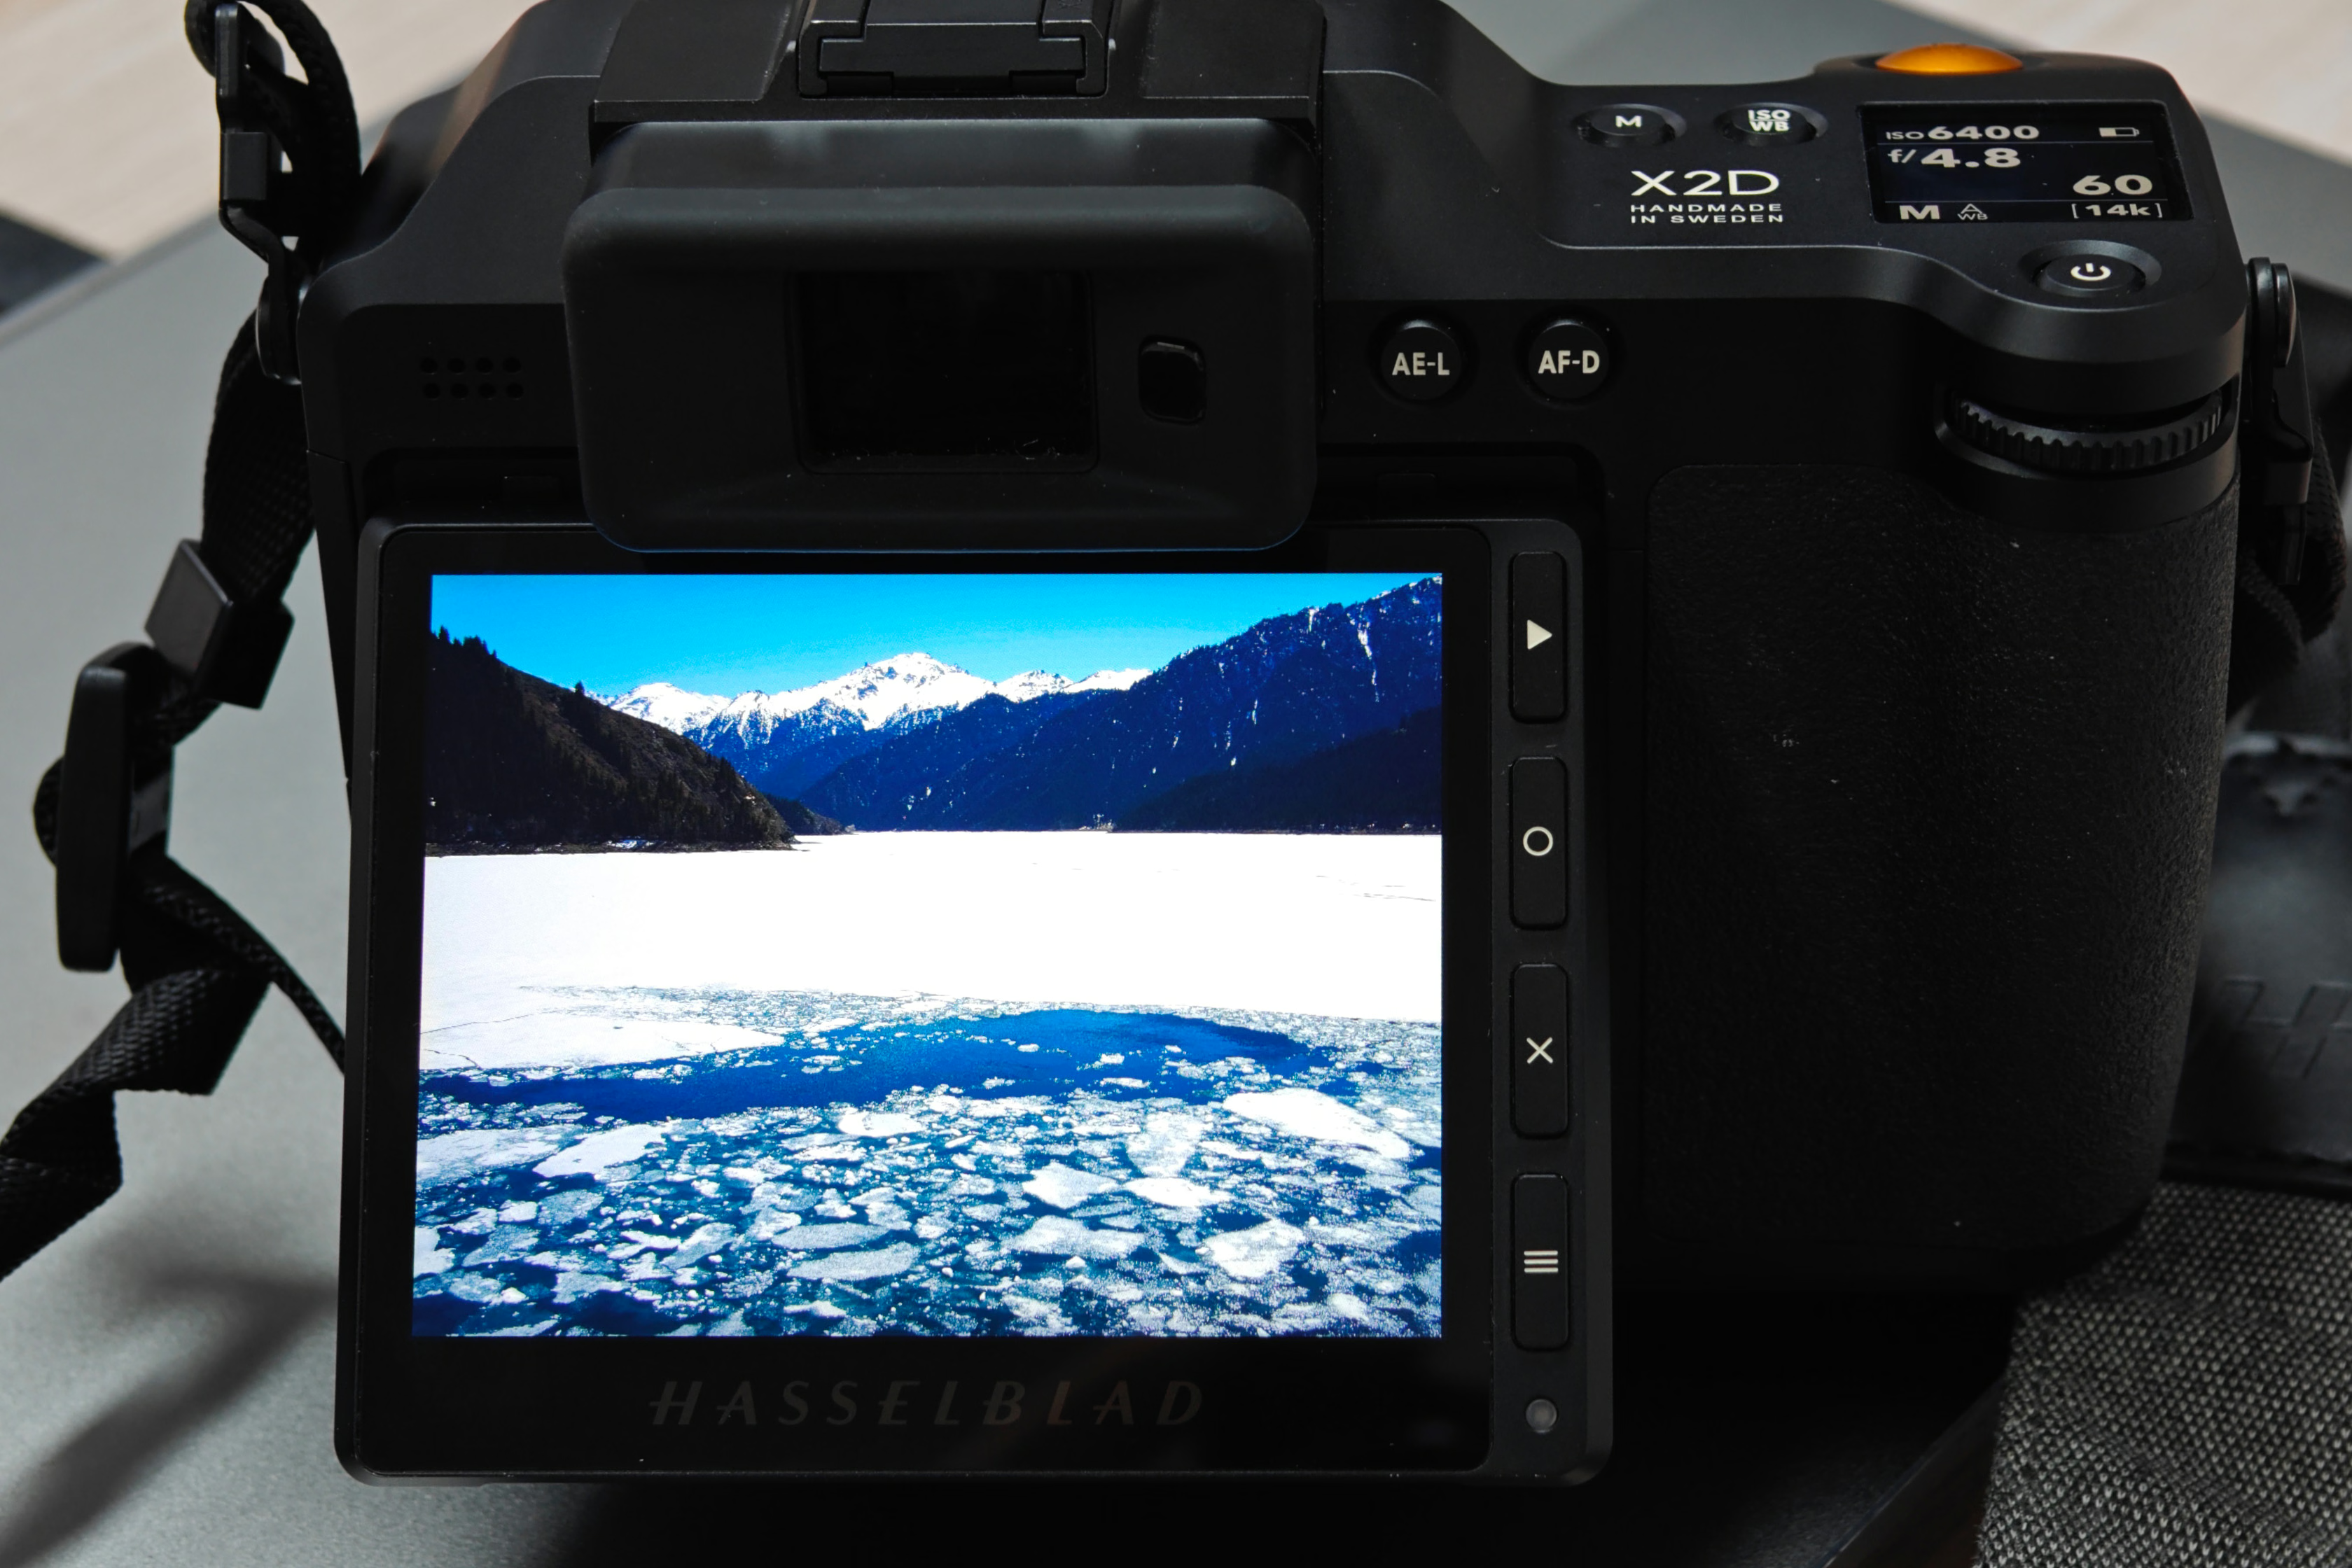
The effect of placing an image from another camera onto the Hasselblad’s screen.
Simple Measurement
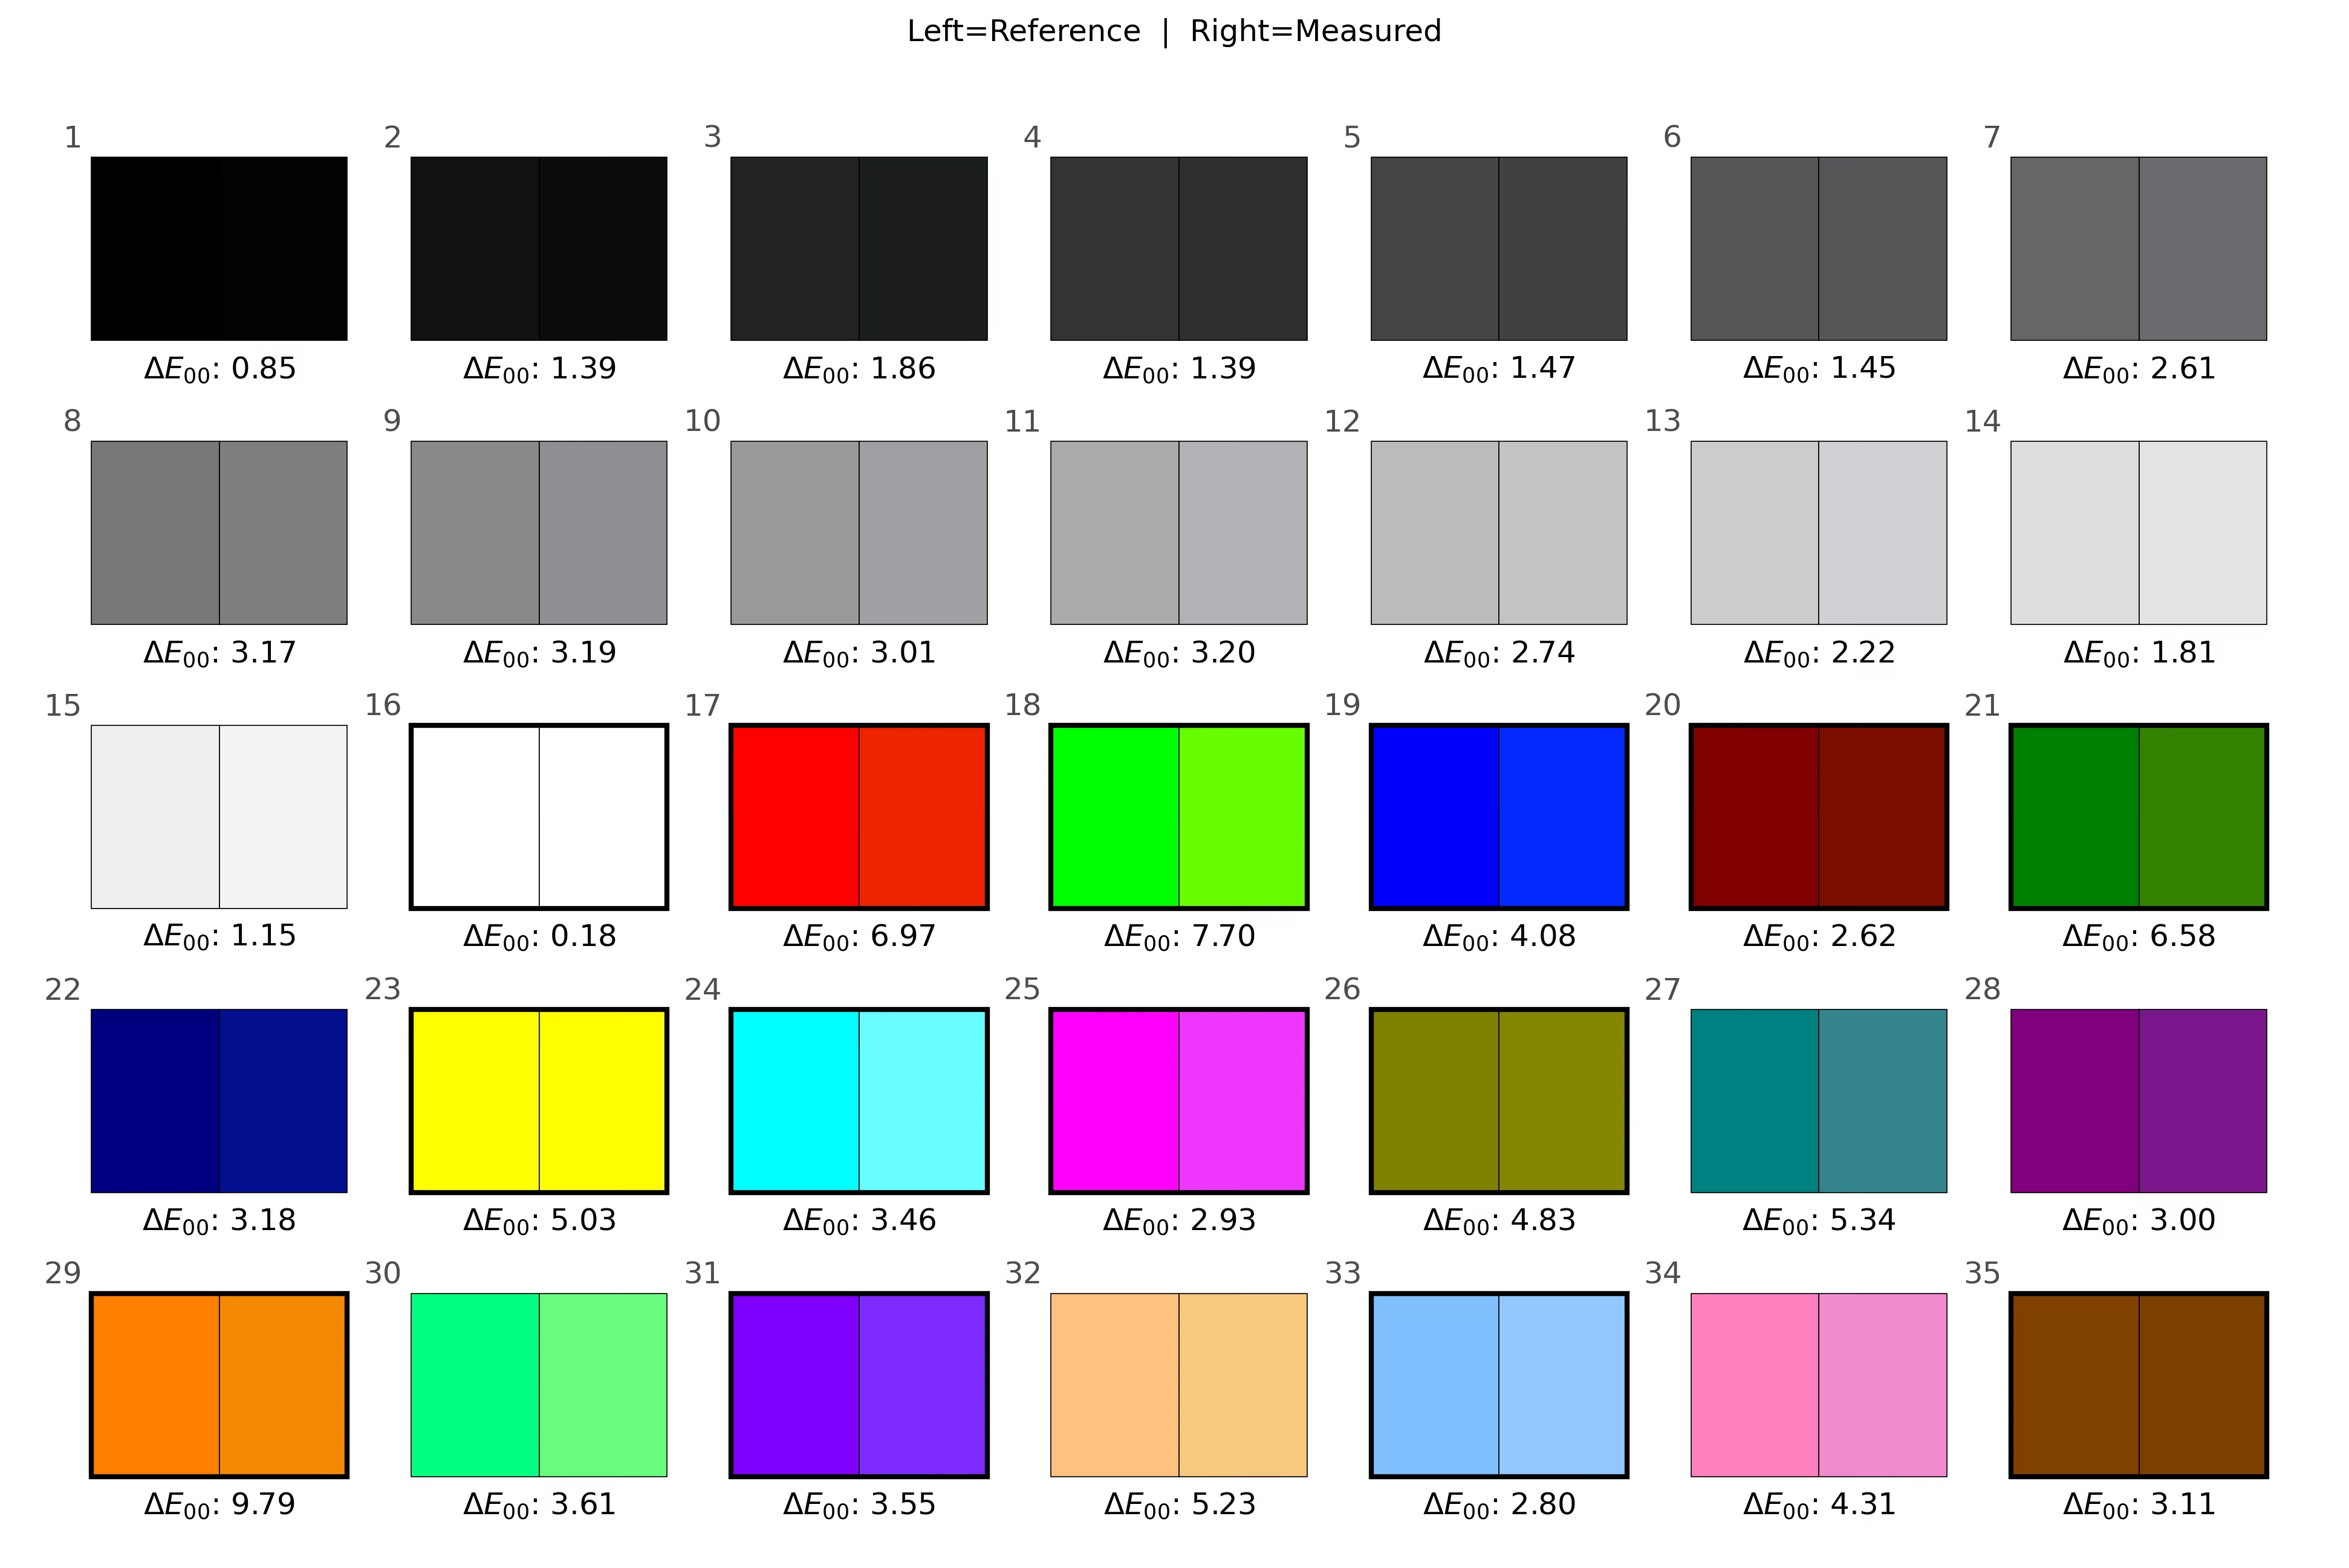
Since in-camera playback requires manual switching, only a small-sample simple measurement could be performed. This time, 40 colour samples were selected.
The chosen test points include:
- Pure colours: 2 each along R/G/B axes (128, 255), 6 in total
- Mixed pure colours: yellow, cyan, magenta, 6 in total
- Greyscale: 0–255, step size 17, plus additional samples at greyscale values 2, 4, 8, 250, 253, totalling 21
- Some mixed colours: 7 in total
These are used to evaluate gamut coverage, greyscale stability, the EOTF transfer function, and colour difference.
Brightness & Contrast
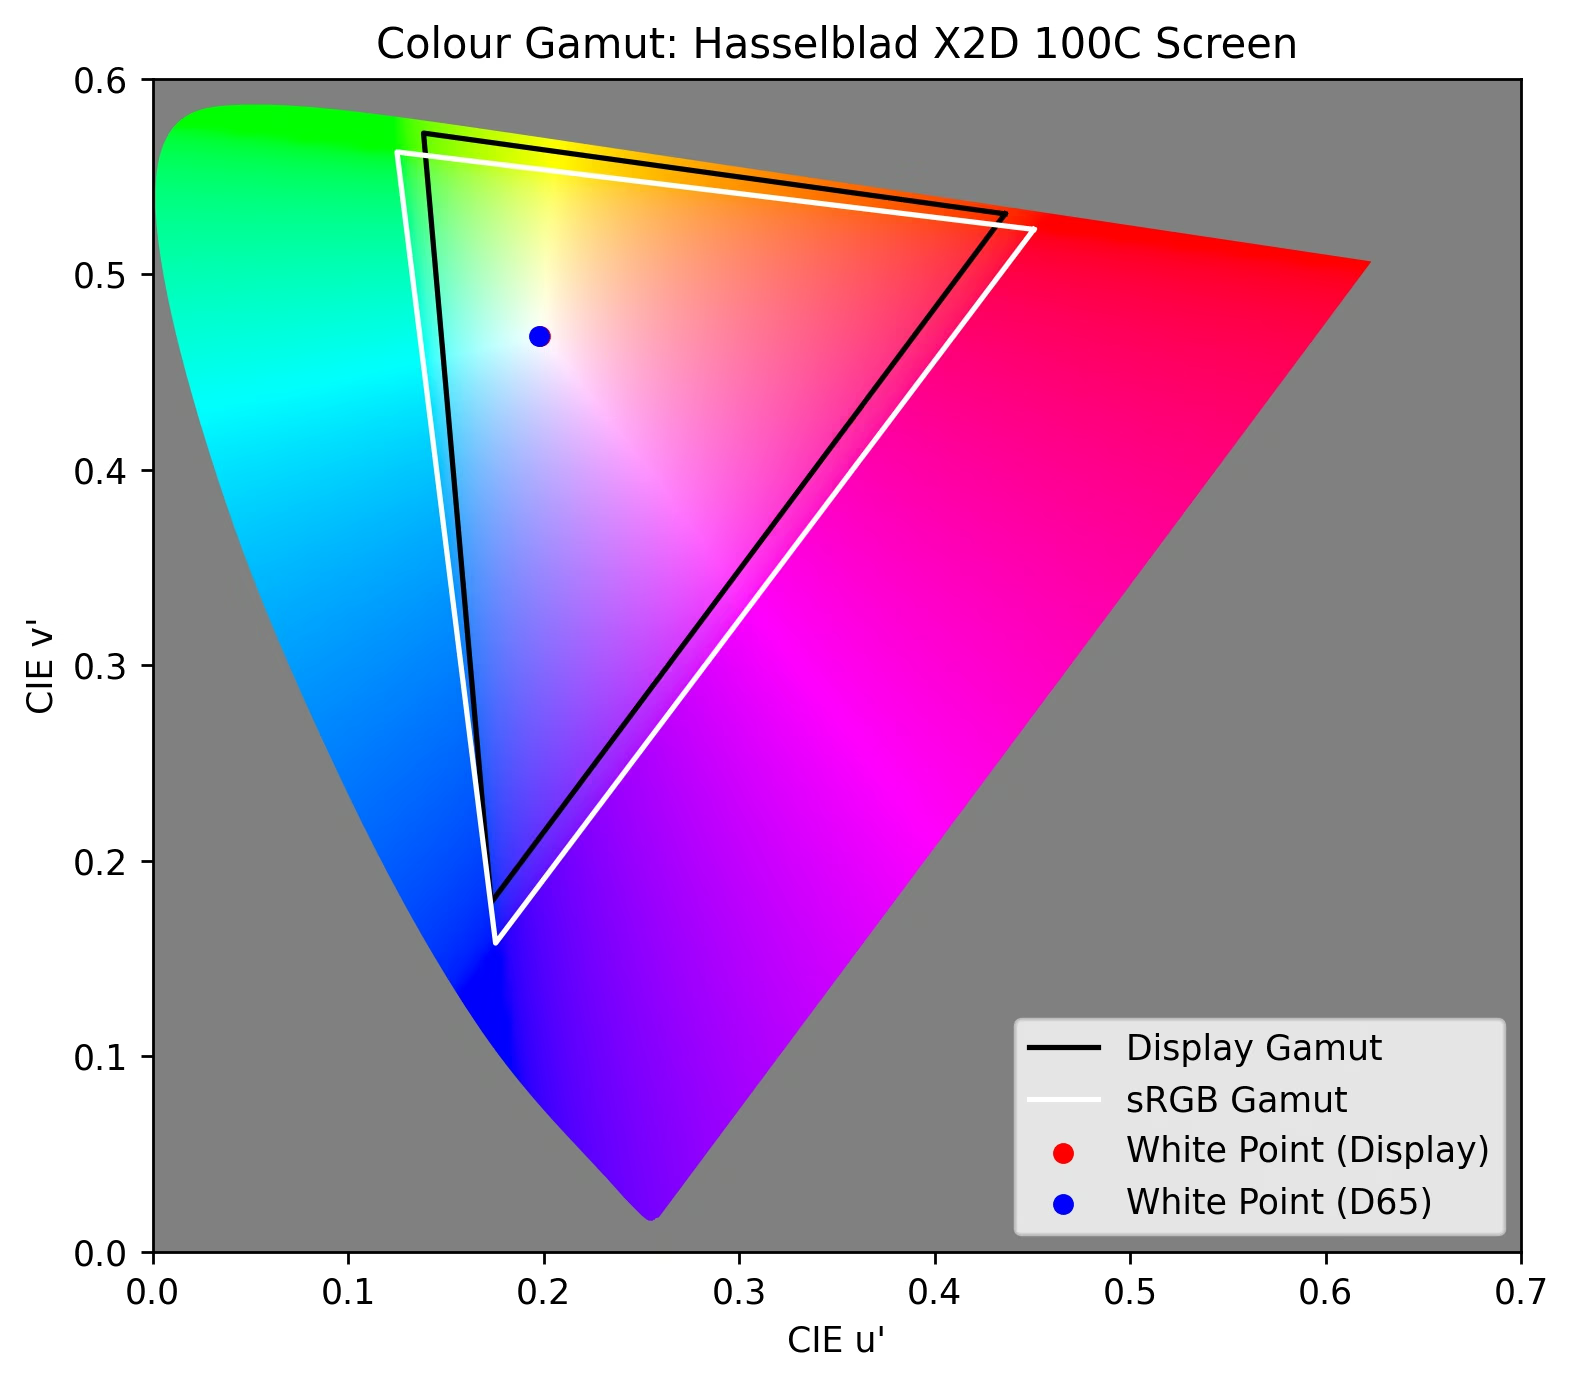
Hasselblad provides a brightness slider to control brightness. At maximum, the measured brightness was 1091.0 nits, and when displaying black it was 0.72 nits, giving a contrast ratio of 1509:1.
The white point xy chromaticity coordinates were (0.3130, 0.3291), with a correlated colour temperature of 6496 K, very close to D65.
Gamut Coverage
Using the primary chromaticity coordinates, gamut coverage and volume relative to sRGB can be calculated:
Converting to CIE 1976 UCS (i.e. u’v’) and calculating the ratio of triangle areas, the gamut coverage relative to sRGB is 85.10%, with a gamut area ratio of 89.07%. On CIE 1931 xy, the gamut coverage is 87.42% with an area ratio of 97.23%.
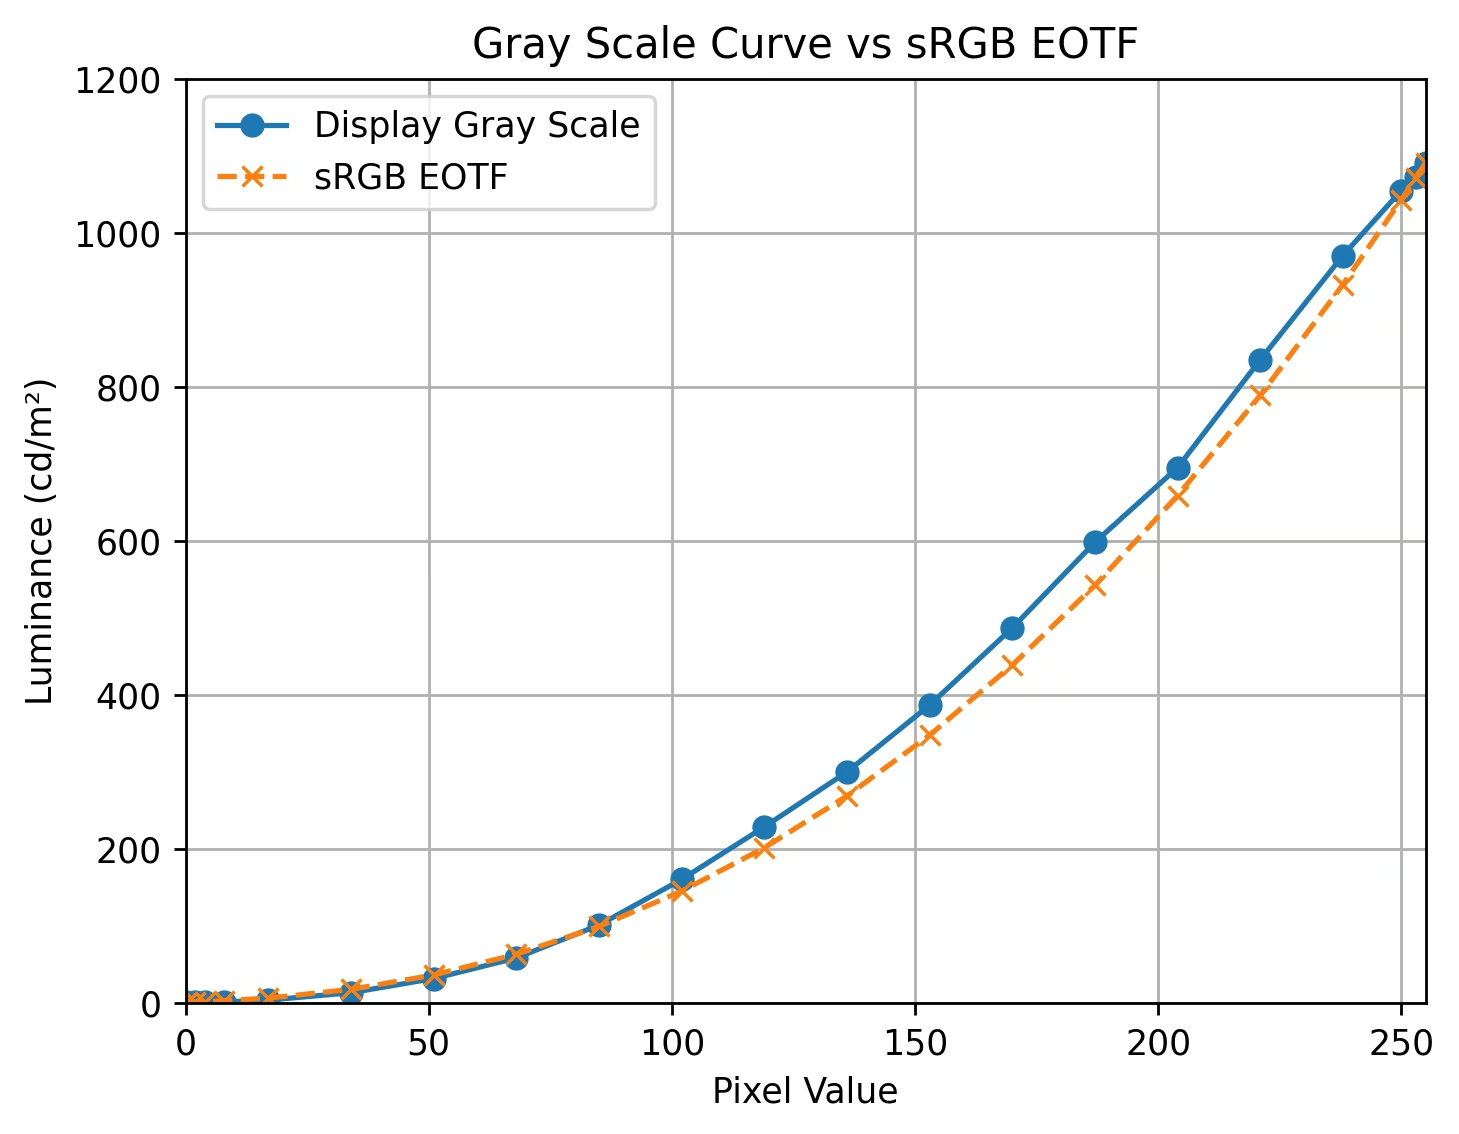
Greyscale & EOTF
Compared to the sRGB EOTF, and in contrast to Sony’s built-in screen, the X2D 100C’s EOTF is elevated, closely fitting a Gamma of approximately 2.0, exhibiting a brighter characteristic. This is fairly consistent with how cameras are typically used outdoors in high-ambient-light conditions.
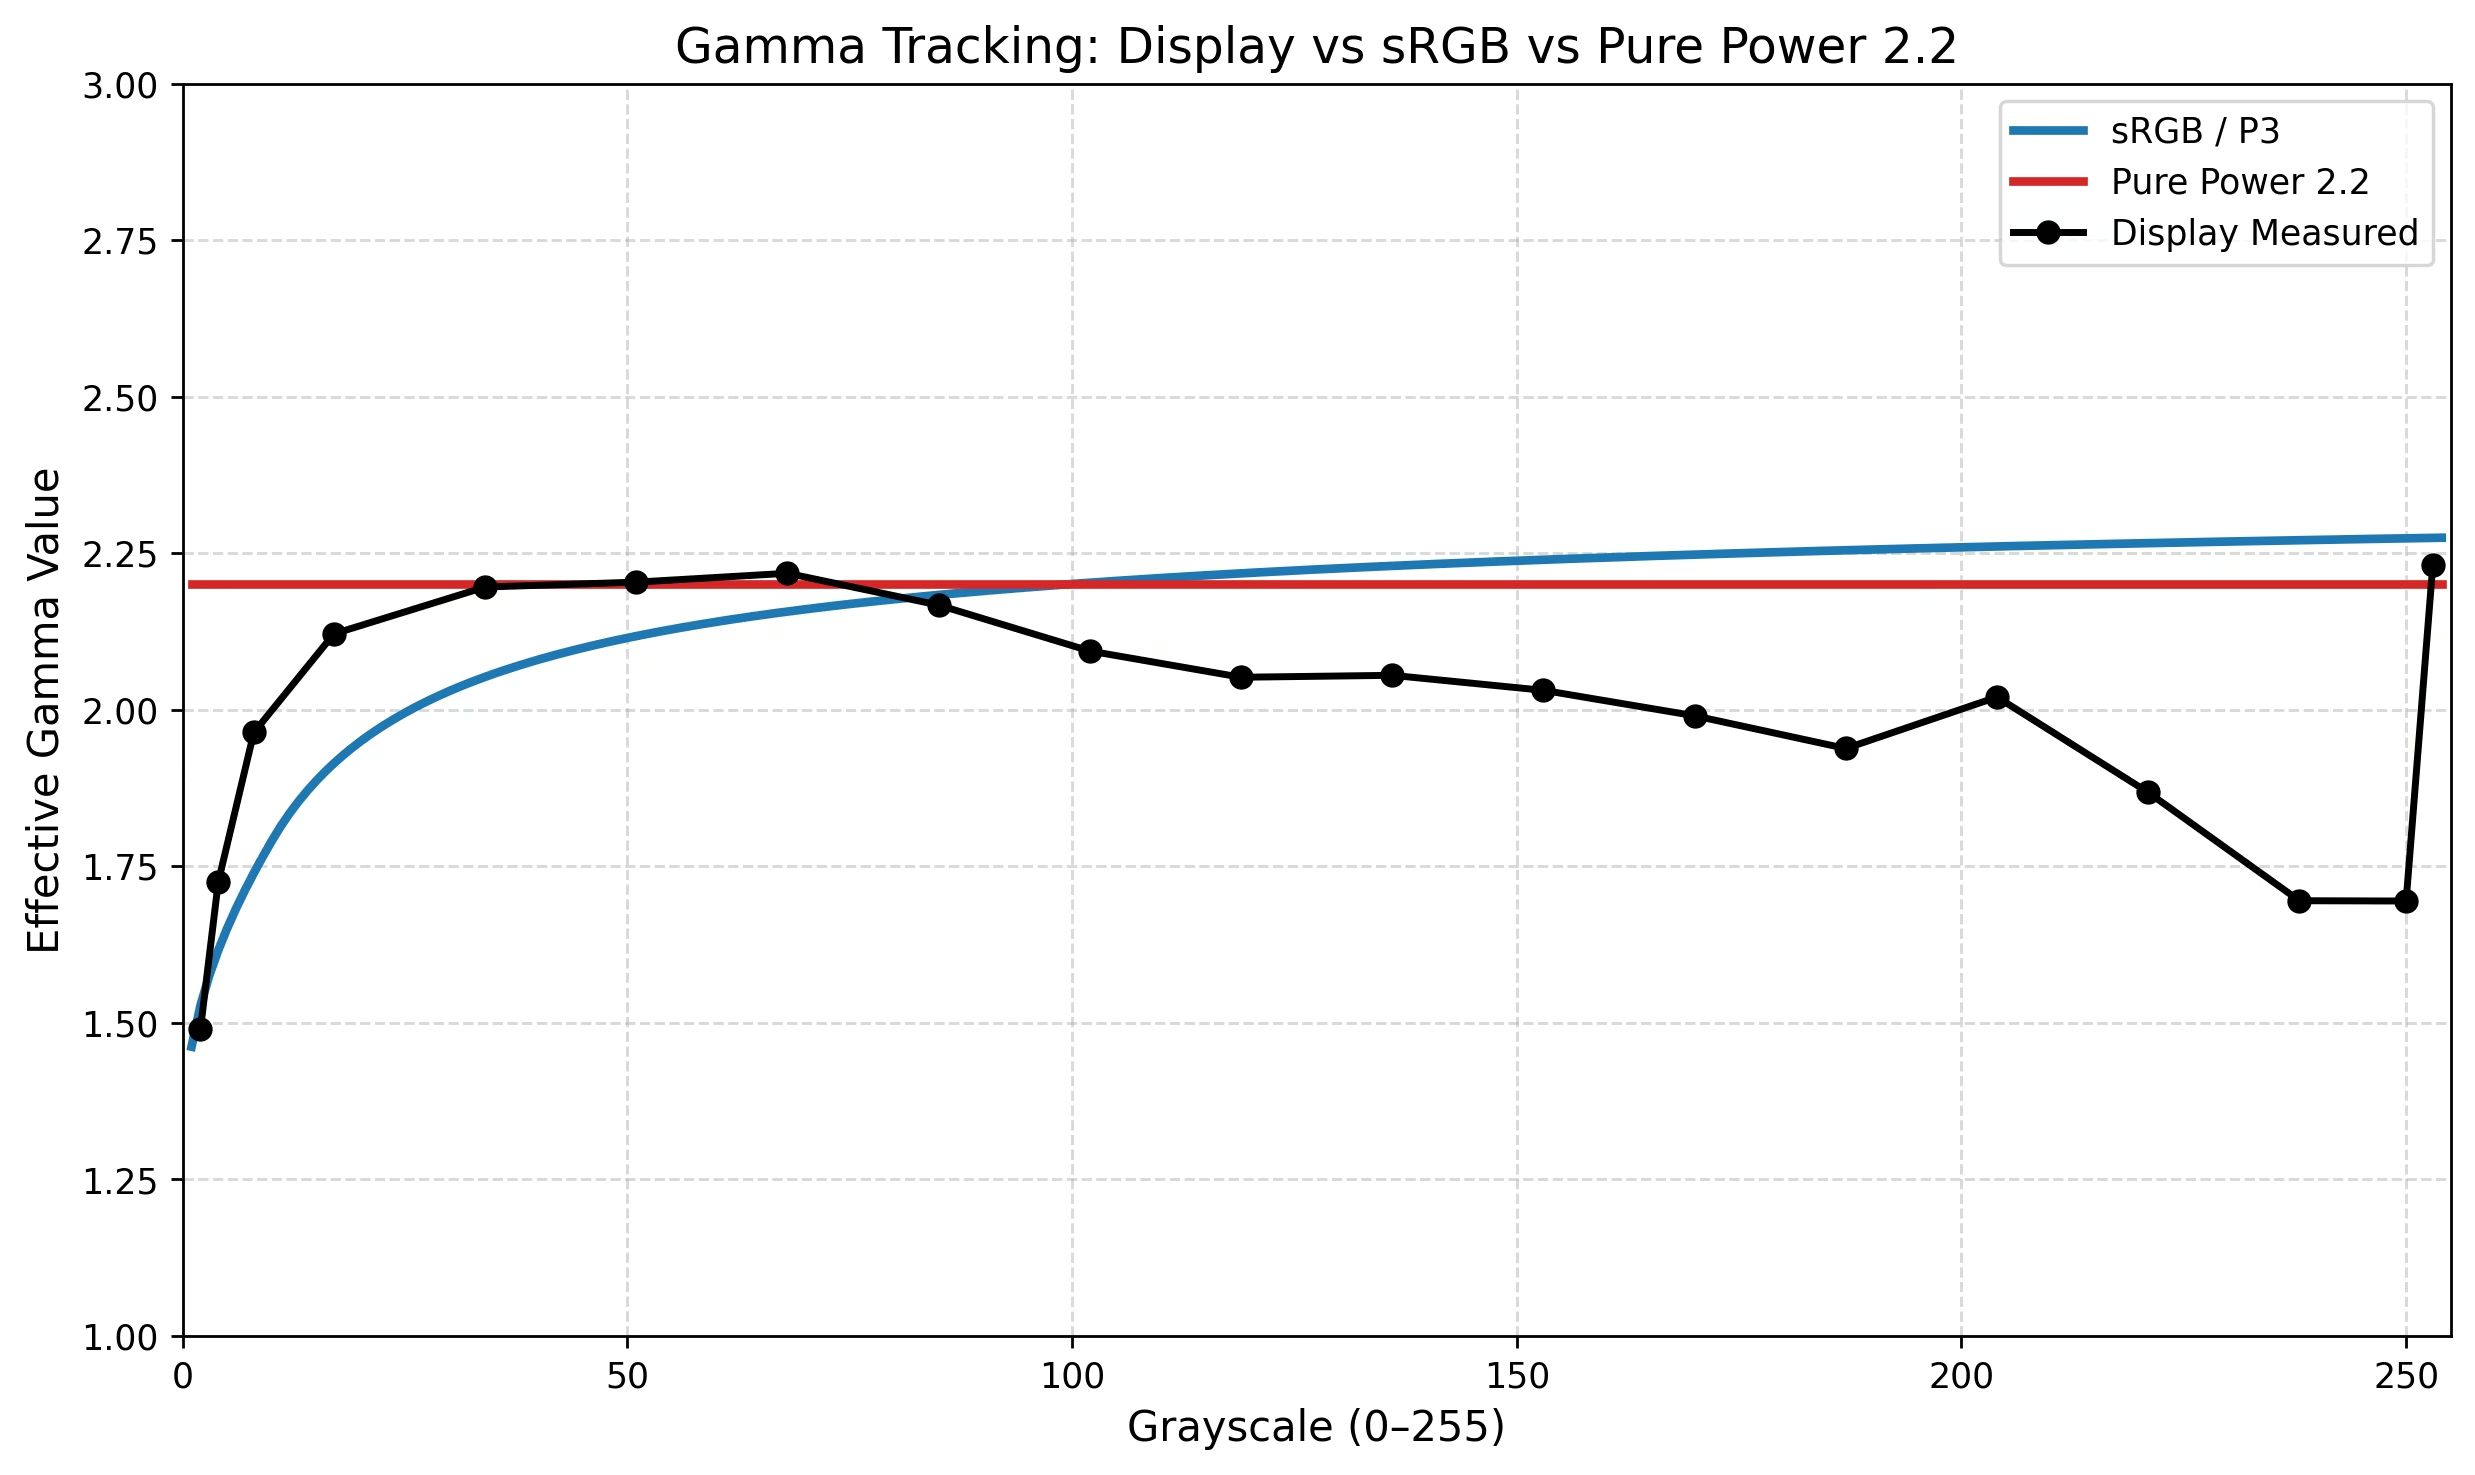
Using gamma tracking, the picture becomes clearer: at mid-to-high brightness levels it’s lower than a 2.2 gamma, and at low brightness it falls between sRGB and a pure 2.2 gamma. This partly explains why, when photos are exported to a more standard display, the contrast and brightness seem to decrease.
Colour Difference
Since straight-out-of-camera images are tagged as sRGB space, an ideal built-in display should conform to standard sRGB. Therefore, using sRGB as the reference and normalising by the brightness when displaying white, the colour difference of 35 colours (excluding the supplementary greyscale samples) relative to standard sRGB was calculated.
Using CIEDE 2000 for colour difference, the average deltaE was 3.42 and the maximum deltaE was 9.79, mainly due to insufficient gamut coverage. Judging from the spectrum, there appears to be no colour management inside the camera.

Stylisation?
With Canon and Hasselblad cameras, I sometimes feel that photos look better on the camera’s built-in screen. Once exported to a computer and viewed on a calibrated display, they don’t seem quite as appealing. Accuracy doesn’t necessarily equate to preference. Since the built-in screen sometimes looks better, and I’ve now measured its characteristics, could it potentially be turned into some kind of stylisation tool?
Using a simple non-linear mapping curve and matrix to describe the Hasselblad’s screen, through the pipeline RGB — (measured data) → XYZ — (standard conversion) → sRGB (or P3), the effect of displaying an sRGB image on this screen can be simulated. Roughly speaking, it’s fairly close to the in-camera display effect.

This simple conversion clips anything outside sRGB, and doesn’t handle shadow detail well, producing some crushed black areas. Perhaps with some fine-tuning it could be made into a LUT.
Summary
This Hasselblad built-in screen isn’t as impressive in its specifications as one might expect. Although the brightness is high, the size is decent, and the EOTF handling is well-suited to outdoor use, the gamut coverage and colour accuracy are somewhat lacking. The OLED screen on the X2D II should deliver better gamut and colour accuracy performance.
If many users like the look of the built-in screen (Canon users, for instance), it might be worth considering measuring the screen’s characteristics and turning them into a stylisation tool. This could also reduce the sense of discrepancy when viewing photos on different display devices.
Appendix: JPEG Details
Some further details about the straight-out-of-camera JPEG files, analysed and compiled by GPT-5.5, for reference only.
Sample File Structure
| Field | Value |
|---|---|
| Make | Hasselblad |
| Model | X2D 100C |
| Software | 3.2.0 |
| Main image size | 11656 x 8742 |
| Main image pixels | ~101.9 MP |
| JPEG type | Baseline DCT, Huffman coding |
| BitsPerSample | 8 |
| ColorComponents | 3 |
| YCbCrSubSampling | YCbCr4:2:2 (2 1) |
| ColorSpace | sRGB |
| JPEGQualityEstimate | 97 |
The quantisation tables and Huffman tables are consistent across the three main images, and exiftool reports the same JPEGDigest.
The main structure of a sample is roughly as follows:
SOI
APP1 Exif
APP1 XMP
APP2 FPXR contents list
APP2 FPXR stream data segment 0
APP2 FPXR stream data segment 1
...
COM zero padding
APP0 JFIF
DQT
DQT
SOF0
DHT
DHT
DHT
DHT
SOS
main image entropy-coded data
EOI
trailer
APP2 FPXR & Preview
All three samples contain an APP2 segment whose payload begins with:
46 50 58 52 00which is ASCII:
FPXR\0This is a FlashPix Ready APP2 multi-segment encapsulation. The contents list has two entries:
/HASSELBLAD
/HASSELBLAD/preview
Of these, /HASSELBLAD/preview is a complete JPEG file stream.
Preview JPEG Properties
The /HASSELBLAD/preview in all three samples is:
| Field | Value |
|---|---|
| JPEG start | ff d8 |
| JFIF | Yes |
| Type | Baseline JPEG |
| Bits | 8 |
| Dimensions | 3888 x 2918 |
| Subsampling | 2x1,1x1,1x1, i.e. 4:2:2 |
4KB Alignment
There is some zero padding after the main image’s COM, the preview’s EOI, and at the end of the file, seemingly to align the main image JPEG header, the preview’s stream length and the overall length to 4KB boundaries.